A trigger is a special kind of a store procedure that executes in response to certain action on the table like insertion, deletion or updating of data. It is a database object which is bound to a table and is executed automatically. You can’t explicitly invoke triggers. The only way to do this is by performing the required action on the table that they are assigned to.
Types of Triggers:

We can create triggers on DDL statements (like CREATE, ALTER, and DROP).
We can use only FOR/AFTER clause in DDL triggers not INSTEAD OF clause means we can make only After Trigger on DDL statements.
DDL trigger can be used to observe and control actions performed on the server, and to audit these operations. DDL triggers can be used to manage administrator tasks such as auditing and regulating database operations.
We can create triggers on DML statements (like INSERT, UPDATE, and DELETE) DML Triggers are of two types
After Trigger (using FOR/AFTER CLAUSE)
This type of trigger fires after SQL Server finishes the execution of the action successfully that fired it.
Example: If you insert row in a table then the trigger with the insert event on this table will fire only after the row passes all the constraints, like as primary key constraint, and some rules. If the row insertion fails, SQL Server will not fire the After Trigger.
Instead of Trigger (using INSTEAD OF CLAUSE)
This type of trigger fires before SQL Server starts the execution of the action that fired it. It does differ from the AFTER trigger. We can have an INSTEAD OF insert/update/delete trigger on a table that successfully executed but does not include the actual insert/update/delete to the table.
Example: If you insert row in a table then the trigger with the insert event on this table will fire before the row passes all the constraints. If the row insertion fails, SQL Server will fire the Instead of Trigger.
CLR triggers are special type of triggers that based on the CLR (Common Language Runtime) in .net framework. CLR integration of triggers has been introduced with SQL Server 2008 and allows for triggers to be coded in one of .NET languages like C#, Visual Basic and F#.
4) Logon Triggers
Logon triggers are special type of trigger that fire when LOGON event of SQL Server is raised. This event is raised when a user session is being established with SQL Server that is made after the authentication phase finishes, but before the user session is actually established. Hence, all messages that we define in the trigger such as error messages, will be redirected to the SQL Server error log.
Logon triggers do not fire if authentication fails. We can use these triggers to audit and control server sessions, such as to track login activity or limit the number of sessions for a specific login.
Advantages of Triggers:
- Triggers can be used as an alternative method for implementing referential integrity constraints.
- By using triggers, business rules and transactions are easy to store in database and can be used consistently even if there are future updates to the database.
- It controls on which updates are allowed in a database.
- When a change happens in a database a trigger can adjust the change to the entire database.
- Triggers are used for calling stored procedures.
- SQL triggers provide an alternative way to run scheduled tasks. By using SQL triggers, you don’t have to wait to run the scheduled tasks because the triggers are invoked automatically before or after a change is made to the data in tables.
- SQL triggers are very useful to audit the changes of data in tables.
Disadvantages (Problems) of Triggers:
- It is easy to view table relationships, constraints, indexes, stored procedure in database but triggers are difficult to view.
- Triggers execute invisible to client-application. They are not visible or can be traced in debugging code.
- It is hard to follow their logic as it they can be fired before or after the database insert/update happens.
- It is easy to forget about triggers and if there is no documentation it will be difficult to figure out for new developers for their existence.
- Triggers run every time when the database fields are updated and it is overhead on system. It makes system run slower.
- Triggers work over tempdb, so extensive use of them needs to be taken into account when thinking about tempdb
I will update the following concepts on Triggers in my next posts.
- Examples of triggers
- Disabling a trigger
- Enable a trigger
- Drop a trigger
- Find the Triggers in a database
Wednesday, December 4, 2013
Populating a Hierarchical Table Using Hierarchical Methods in SQL Server 2012
SQL Server 2012 have greate feature to create Hierarchical Table Using Hierarchical Methods.
Creating EmployeeOrg table for implement Hierarchy.
USE AdventureWorks2012 ;
GO
CREATE TABLE HumanResources.EmployeeOrg
(
OrgNode HIERARCHYID PRIMARY KEY CLUSTERED,
OrgLevel AS OrgNode.GetLevel(),
EmployeeID INT UNIQUE NOT NULL,
EmpName VARCHAR(20) NOT NULL,
Title VARCHAR(20) NULL
) ;
GO
CREATE UNIQUE INDEX EmployeeOrgNc1
ON HumanResources.EmployeeOrg(OrgLevel, OrgNode) ;
GO
To insert the root of the hierarchy tree:
INSERT HumanResources.EmployeeOrg (OrgNode, EmployeeID, EmpName, Title)
VALUES (HIERARCHYID::GetRoot(), 6, 'Swathi', 'CEO') ;
GO
To create a procedure for entering new nodes:
1. To simplify entering data, create the following stored procedure to add employees to the EmployeeOrg table. The procedure accepts input values about the employee being added. This includes the EmployeeID of the new employee's manager, the new employee's EmployeeID number, and their first name and title. The procedure uses GetDescendant() and also the GetAncestor() method. Execute the following code to create the procedure:
CREATE PROC AddEmp(@mgrid int, @empid int, @e_name varchar(20), @title varchar(20))
AS
BEGIN
DECLARE @mOrgNode hierarchyid, @lc hierarchyid
SELECT @mOrgNode = OrgNode
FROM HumanResources.EmployeeOrg
WHERE EmployeeID = @mgrid
SET TRANSACTION ISOLATION LEVEL SERIALIZABLE
BEGIN TRANSACTION
SELECT @lc = max(OrgNode)
FROM HumanResources.EmployeeOrg
WHERE OrgNode.GetAncestor(1) =@mOrgNode ;
INSERT HumanResources.EmployeeOrg (OrgNode, EmployeeID, EmpName, Title)
VALUES(@mOrgNode.GetDescendant(@lc, NULL), @empid, @e_name, @title)
COMMIT
END ;
GO
2. The following example adds the remaining 4 employees that report directly or indirectly to David.
EXEC AddEmp 6, 10, 'Srinivas', 'Marketing Specialist';
EXEC AddEmp 6, 55, 'Rambabu', 'Marketing Expert';
EXEC AddEmp 55, 269, 'Bhanu', 'Marketing Assistant';
EXEC AddEmp 10, 272, 'Kotesh', 'Development Assistant';
3. Again, execute the following query examine the rows in the EmployeeOrg table
SELECT OrgNode.GetAncestor(1) AS Ancestor, OrgNode.ToString() AS Text_OrgNode, OrgNode, OrgLevel, EmployeeID, EmpName, Title
FROM HumanResources.EmployeeOrg ;
GO
Here is the result set.

Monday, October 28, 2013
Normalization in SQL Server
Normalization with Examples
According to the database rules, below are the lists of Normalization forms
1. 1NF (Eliminating Repeating Groups)
Make a separate table for each set of related attributes and give each table a primary key. In simple words I can say it as
- There are no repeating or duplicate fields.
- Each cell contains only a single value.
- Each record is unique and identified by primary key
Let’s see the example below:
Prior to Normalization
Item Colors Price Tax
Pen red, blue 2.0 0.20
Scale red, yellow 2.0 0.20
Pen red, blue 2.0 0.20
Bag blue, black 150.00 7.80
This table is not in first normal form because:
- There are multiple fields in color lab.
- Records are repeating (Duplicate records) or no primary key.
First Normal Form (1NF)
Item Colors Price Tax
Pen red 2.0 0.20
Pen blue 2.0 0.20
Scale red 2.0 0.20
Scale yellow 2.0 0.20
Bag blue 150.00 7.80
Bag black 150.00 7.80
This table is now in first normal form.
2. 2 NF (Eliminating Redundant Data)
If an attribute is dependent on only part of the multivalued key, then remove it to a separate table. In simple words,
- It should meet all the requirements of the first normal form.
- It should remove subsets of data that apply to multiple rows of a table and place them in separate tables.
- It creates relationships between these new tables and their predecessors through the use of foreign keys.
The First Normal form deals with the atomicity whereas the Second Normal Form deals with the relationship between the composite key columns and non-key columns. To achieve the next progressive level your table should satisfy the requirement of First Normal Form then move towards the Second Normal Form.
Let’s introduce a Review table as an example:
Item Colors Price Tax
Pen red 2.0 0.20
Pen blue 2.0 0.20
Scale red 2.0 0.20
Scale yellow 2.0 0.20
Bag blue 150.00 7.80
Bag black 150.00 7.80
Table is not in Second Normal Form because the price and tax depends on the item, but not color.
Item Colors
Pen red
Pen blue
Scale red
Scale yellow
Bag blue
Bag black
Item Price Tax
Pen 2.0 0.20
Scale 2.0 0.20
Bag 150.00 7.80
Tables are now in Second Normal Form.
3. 3NF (eliminate Columns not dependent on the Key)
If attributes do not contribute description of the key, then remove it to the separate table. All the attributes must be directly dependent on the primary key. In simple words,
- It should meet all the requirements of the second normal form.
- It should remove columns that are not dependent upon the primary key.
- In the Third Normal Form all columns depend upon the primary key. When one column depends upon the other column, tables break the rule and turn into the dependency on the primary key.
Item Colors
Pen red
Pen blue
Scale red
Scale yellow
Bag blue
Bag black
Item Price Tax
Pen 2.0 0.20
Scale 2.0 0.20
Bag 150.00 7.80
Tables are not in Second Normal Form because tax depends on price, not item.
Item Colors
Pen red
Pen blue
Scale red
Scale yellow
Bag blue
Bag black
Item Price
Pen 2.0
Scale 2.0
Bag 150.00
Price Tax
2.0 0.20
150.00 7.80
Friday, August 23, 2013
ON UPDATE CASCADE and ON DELETE CASCADE in SQL Server
CASCADE allows deletions or updates of key values to cascade through the tables defined to have foreign key relationships that can be traced back to the table on which the modification is performed. ON DELETE CASCADE specifies that if an attempt is made to delete a row with a key referenced by foreign keys in existing rows in other tables, all rows containing those foreign keys are also deleted. ON UPDATE CASCADE specifies that if an attempt is made to update a key value in a row, where the key value is referenced by foreign keys in existing rows in other tables, all of the foreign key values are also updated to the new value specified for the key.
Let me reproduce the simple scenario in T-SQL.
-- Creating Table Products
CREATE TABLE [dbo].[Products]
(
[ProductID] [int] NOT NULL PRIMARY KEY CLUSTERED,
[ProductDesc] [varchar](50) NOT NULL
)
GO
-- Creating Table ProductDetails
CREATE TABLE [dbo].[ProductDetails]
(
[ProductDetailID] [int] NOT NULL PRIMARY KEY CLUSTERED,
[ProductID] [int] NOT NULL
CONSTRAINT [FK_ProductDetails_Products] FOREIGN KEY([ProductID])
REFERENCES [dbo].[Products] ([ProductID])
ON UPDATE CASCADE
ON DELETE CASCADE,
[Total] [int] NOT NULL
)
GO
-- Insert Data into Table
INSERT INTO Products (ProductID, ProductDesc)
VALUES (1, 'Bike'),(2, 'Car'),(3, 'Books')
GO
INSERT INTO ProductDetails ([ProductDetailID],[ProductID],[Total])
VALUES (1, 1, 200),(2, 1, 100),(3, 1, 111),(4, 2, 200),(5, 3, 100),
(6, 3, 100),(7, 3, 200)
GO
--Select Data from Tables
SELECT *
FROM Products
SELECT *
FROM ProductDetails
GO

On Delete:
--Delete Data from Products Table
DELETE
FROM Products
WHERE ProductID = 1
GO
--Select Data from Tables Again
SELECT *
FROM Products
SELECT *
FROM ProductDetails
GO

On Update:
--Update Data from Tables
UPDATE Products
SET ProductID = 5
WHERE ProductID = 3
GO
--Select Data from Tables Again
SELECT *
FROM Products
SELECT *
FROM ProductDetails
GO

Tuesday, February 12, 2013
How to Add a Linked Server
Adding a Linked server can be done by either using the GUI interface or the sp_addlinkedserver command.
Adding a linked Server using the GUI
There are two ways to add another SQL Server as a linked server. Using the first method, you need to specify the actual server name as the “linked server name”. What this means is that everytime you want to reference the linked server in code, you will use the remote server’s name. This may not be beneficial because if the linked server’s name changes, then you will have to also change all the code that references the linked server. I like to avoid this method even though it is easier to initially setup. The rest of the steps will guide you through setting up a linked server with a custom name:
To add a linked server using SSMS (SQL Server Management Studio), open the server you want to create a link from in object explorer.
- In SSMS, Expand Server Objects -> Linked Servers -> (Right click on the Linked Server Folder and select “New Linked Server”)
- The “New Linked Server” Dialog appears. (see below).

Add New Linked Server

Linked Server Settings
- For “Server Type” make sure “Other Data Source” is selected. (The SQL Server option will force you to specify the literal SQL Server Name)
- Type in a friendly name that describes your linked server (without spaces). I use AccountingServer.
- Provider – Select “Microsoft OLE DB Provider for SQL Server”
- Product Name – type: SQLSERVER (with no spaces)
- Datasource – type the actual server name, and instance name using this convention: SERVERNAMEINSTANCENAME
- ProviderString – Blank
- Catalog – Optional (If entered use the default database you will be using)
- Prior to exiting, continue to the next section (defining security)
- Define the Linked Server Security
Linked server security can be defined a few different ways. The different security methods are outlined below. The first three options are the most common:
| Option Name | Description |
| Be made using the login’s current security context | Most Secure. Uses integrated authentication, specifically Kerberos delegation to pass the credentials of the current login executing the request to the linked server. The remote server must also have the login defined. This requires establishing Kerberos Constrained Delegation in Active Directory, unless the linked server is another instance on the same Server. If instance is on the same server and the logins have the appropriate permissions, I recommend this one. |
| Be made using this security context | Less Secure. Uses SQL Server Authentication to log in to the linked server. The credentials are used every time a call is made. |
| Local server login to remote server login mappings | You can specify multiple SQL Server logins to use based upon the context of the user that is making the call. So if you have George executing a select statement, you can have him execute as a different user’s login when linking to the linked server. This will allow you to not need to define “George” on the linked server. |
| Not be made | If a mapping is not defined, and/or the local login does not have a mapping, do not connect to the linked server. |
| Be made without using a security context | Connect to the server without any credentials. I do not see a use for this unless you have security defined as public. |
- Within the same Dialog on the left menu under “Select a Page”, select Security
- Enter the security option of your choice.

- Linked Server Security Settings
- Click OK, and the new linked server is created
Monday, December 17, 2012
Execute Keyword in SQL Server 2012
Today, I have provided an article showing you an improved version of the execute keyword in SQL Server 2012. The EXECUTE keyword is used to execute a command string. You cannot change the column name and datatype using the execute keyword in SQL Server 2005/2008. You have to modify the stored procedure respectively. The previous version of SQL Server only has the WITH RECOMPILE option to force a new plan to be re-compiled. The ability to do that in SQL Server 2012dramatically improves this part. In SQL Server 2012, there is no need to modify a stored procedure. You can change the column name and datatype using the execute keyword. So let's take a look at a practical example. The example is developed in SQL Server 2012 using the SQL Server Management Studio.
The table looks as in the following:
Create TABLE UserDetail
(
User_Id int NOT NULL IDENTITY(1,1),
FirstName varchar(20),
LastName varchar(40) NOT NULL,
Address varchar(255),
PRIMARY KEY (User_Id)
)
INSERT INTO UserDetail(FirstName, LastName, Address)
VALUES ('Smith', 'Kumar','Capetown'),
('Crown', 'sharma','Sydney'),
('Copper', 'verma','Jamaica'),
('lee', 'verma','Sydney')
go
Now create a stored procedure for the select statement in SQL Server 2008:
Create PROCEDURE SelectUserDetail
as
begin
select FirstName,LastName, Address from UserDetail
end
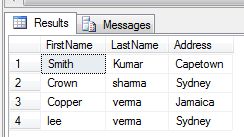
Now use an Execute command to run the stored procedure:
-- SQL Server 2008
execute SelectUserDetail
Output
SQL Server 2012
Now we see how we can change the column name and datatype using an execute keyword in SQL Server 2012. The previous version of SQL Server only has the WITH RECOMPILE option to force a new plan to be re-compiled. To do that in SQL Server 2012 dramatically improves this part. We change the FirstName to Name and the datatype varchar(20) to char(4). Now execute the following code in SQL Server 2012:
WITH result SETS
(
(
Name CHAR(4),
Lastname VARCHAR(20),
Address varchar(25)
)
);
Now Press F5 to run the query and see the result:
No comments:
Post a Comment